
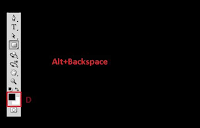
On this occasion, I tried to create a metallic effect on a post. Actually, to make too much of this effect is given by way of Photoshop from the complicated to the simple peling depending on the skills and imagination.Of course, for my own, we must start from the simplest steps because I was just learning and training. I created this article, nothing more to remind me when I forget.Ok ... too many strings attached, we immediately wrote workout how the steps.Step 1.As always, open a new document by choosing File - New (Ctrl + N). for height and width you wrote 1024 × 500 pixels / inch, resolution 72px with a White background.Note on the Set Foreground color and backgraound adapah black and white, if belemu, press (D) to reverse to its original color. If it is press Alt + Backspace to color backgraound layer with black.
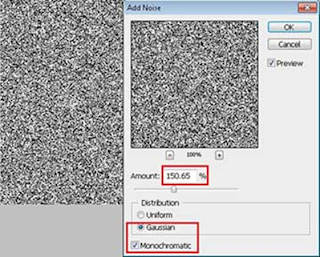
 Step 2. Now create a new layer (Shift + Ctrl + N) love the name of Gray, then love the color gray (# bebebe) by selecting Edit - Fill (Shift + F5).Next go to Filter - Noise - Add Noise and set Amount: 150.65%, Distribution: Gaussian and check Monochromatic.
  Step 3.Give the effects of blur by choosing Filter - Blur - Motion Blur. Set the angle to 15 degrees and 210 pixels distance.Now cut and take the center of motion blur with the Crop. See illustration below.
Step 4.Select the Horizontal Type Tool (T) on the toolbox and then make a post up to you with any font and size adjustable. Gray and place it below the layer.
Step 5.In this step, we enter the texture that we have in the previous step into the post "2 TKJ 2" by pressing Alt tombok kemdudian click the midline between the layer and layer text Gray (2 TKJ 2). Or select Layer - Create Clipping Mask (Ctrl + Alt + G).
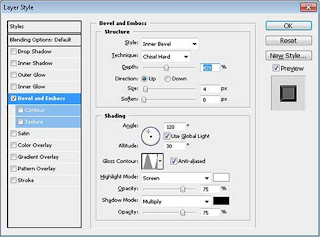
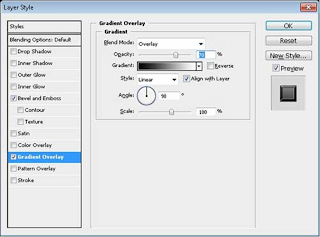
 Still on the layer style, now select Gradient Overlay and set the bland mode to Overlay with 70% Opacity.
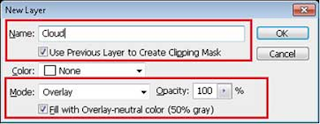
 Step 7.Basically up to step 6, we have finished creating metallic effects on paper. But to make it look more nice and cool. We love 2 Clouded an effect more like noise.Create a new layer above layer Gray (Shift + Ctrl + N), love the name cloud and check Use Previous Layer to Create Clipping Mask. To select the Overlay Mode and uncheck the option Fill with Overlay-natural color (50% Gray).Select Filter - Render - Cloud, then now you blur by choosing Filter - Blur Gaussian Blur.Set the radius is 8.5 - 10 pixels.
 Now create another new layer (Shift + Ctrl + N) as in the above step, but for the mode to Multiply and love changed the name of Noise.If you already go to Filter - Noise - Add Noise, leave as a rule you created in step 2 above.
To soften the effects of noise, now go to Filter - Noise - Median. Set radousnya so 9 pixels. Change the bland mode to Multiply with opacity of 70%.Until here everything is finished. Friends can megganti background that you think fit!
|
|
NAMA ANDA
| MASUKKAN TOMBOL TWEET DISINI |
|


0 komentar:
Posting Komentar